Arclab® Inbox2DB
How to Collect Form Data/Submissions
via Email using a Web Form
Collect Web Form Data
on Your Computer
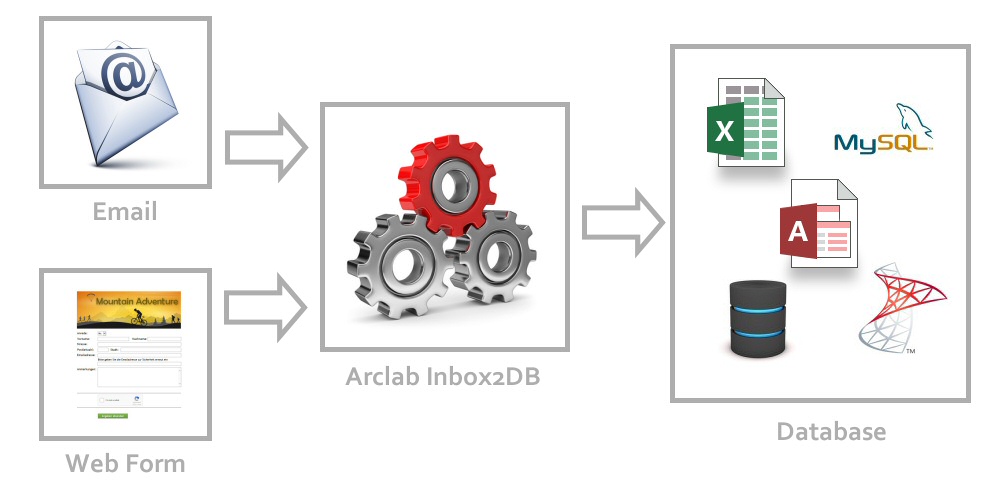
Today almost every website uses a web form to collect information from an user. One solution might be use a script to write the data to a SQL database on the server or use an external service provider to collect the data for you, but this might not be the right solution for every situation. If you need the data directly on your computer, for example in an excel spreadsheet or database on your computer, then a different approach is needed.
Arclab InboxDB works different - it collects the form data out of an email message generated by a web form on your own server. It does not require any database on your web server, complicated web scripts for database access or external services. Inbox2DB picks up the mail, collects the form data and saves it to your sheet or database.
Here open_in_new you will find further details on how you can process the data from a web form created with Arclab® Web Form Builder and insert it into an MS Excel file, MS Access file or an ODBC database.
Inbox2DB is an email automation solution and email parser software to collect data from incoming messages and insert the information into a database.

Email Form Data Extraction
Arclab InboxDB checks your email account for new
incoming messages matching the defined filter, e.g. sender and/or subject
keywords. If the program has detected a message meeting the filter criteria,
it downloads the message from the email account and starts the data
extraction process.
It maps the data of every field from the
email to the corresponding column in your database or sheet. Inbox2DB
automatically converts the data to the column field type, so you don't
need to care about data types or cast operators. It allows you to process
multiple forms using the same email account.
Download 14 days Trial Version Screenshots
check Collect the form data in a database or sheet
check Automatic and custom field mapping
check Insert file attachments into a database
check Insert the full email source code (EML) into a database
check Save file attachments to disc
check Process the form data directly on your computer
check No database on the web server required
check No installation on the web server required
check Works with most forms
check E.U. GDPR Compliant
check No subscription and no recurring fees
How it works:
1. Create the Web Form on your Web Site
First you need a web form, which sends the information entered by the user to your email mailbox. If you already have a contact form, then you can simply modify it a bit. Basically you can use any form or script (form mailer) sending the form submission as email message. Most hosting services already provide a contact form, which can be customized and used for this purpose. If you want to create a more sophisticated form, e.g. using a captcha, then we recommend to try Arclab® Web Form Builder.
2. Create a Database or Sheet on your Computer or Network
Arclab Inbox2DB can store the data in almost any database system, from MS Excel to an ODBC database. Simply create a database or sheet containing the columns you want to gather from your form. Please make sure, that you define the column data types as required. The program automatically converts the data collected from the web form to the data types of the database. If you want to use a MS Excel sheet as target, then you should create a sample row to ensure that the program can detect the data types correctly. See also: Email to MS Excel Spreadsheet
3. Setup a Data Connection in Arclab Inbox2DB
Setting up a data connection in Inbox2DB is not difficult. Specify the account data for the email account and define a message filter, so that the program can pick up the correct email message. Defining a message filter is not difficult ... simply type in the subject of the message created by your form, e.g. "Customer Survey". The column relationship can be setup based on a sample message. Its recommended to open your web browser, fill out your web form and submit it once before going further. The program can collect data from all form based messages, HTML or plain text messages. It tries to auto-detect matching fields or you can setup the field relationship by hand. The "Detection Simulation" allows you to verify that all fields are setup as wanted.
4. Execute the Data Connection
You can execute the data connection (which means check for incoming messages and collect data) manually or based on a timer. Its not required to run the program 24/7, because the messages with the form data will stay on your mail server until the program starts the processing. The program can also run hidden in the background without user intervention if your workflow requires a constant data processing, e.g. every 10 minutes.