Edit Column Relationship
Arclab® Inbox2DB
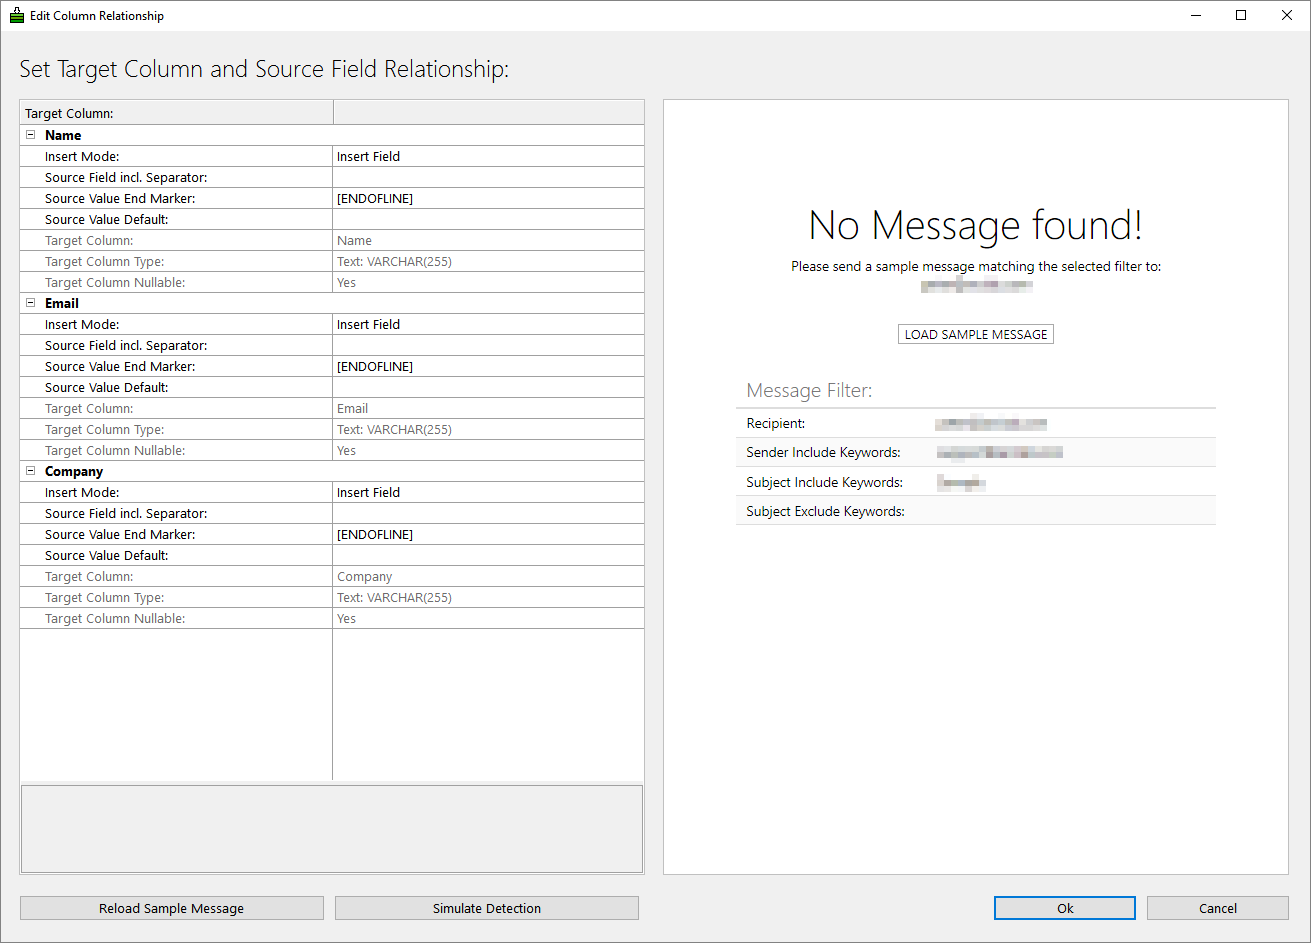
Send a Sample Message to your Inbox
The setup of the email extraction ("Source Field Relationship")
is based on a sample message.
First send a sample message to the specified
email address and load the sample message into the program.
See also:
Define Source Fields and Values in the Sample Message
Inbox2DB auto-detects matching field names if you have not defined any
field names before.
Otherwise you can setup the fields using
"Source Field incl. Separator" and
"Source Value End Marker".
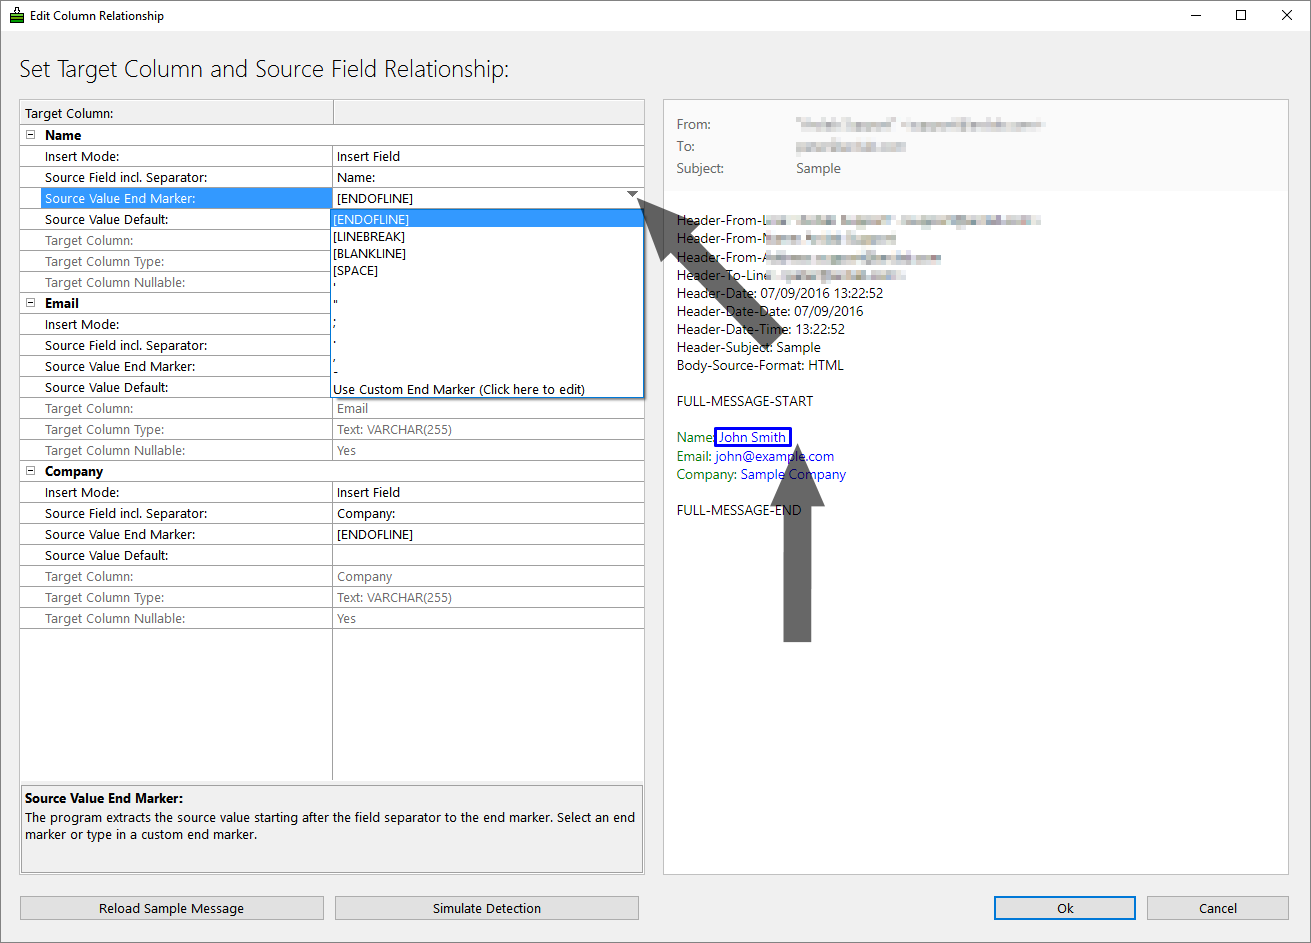
Click on "Simulate Detection" to verify the settings.
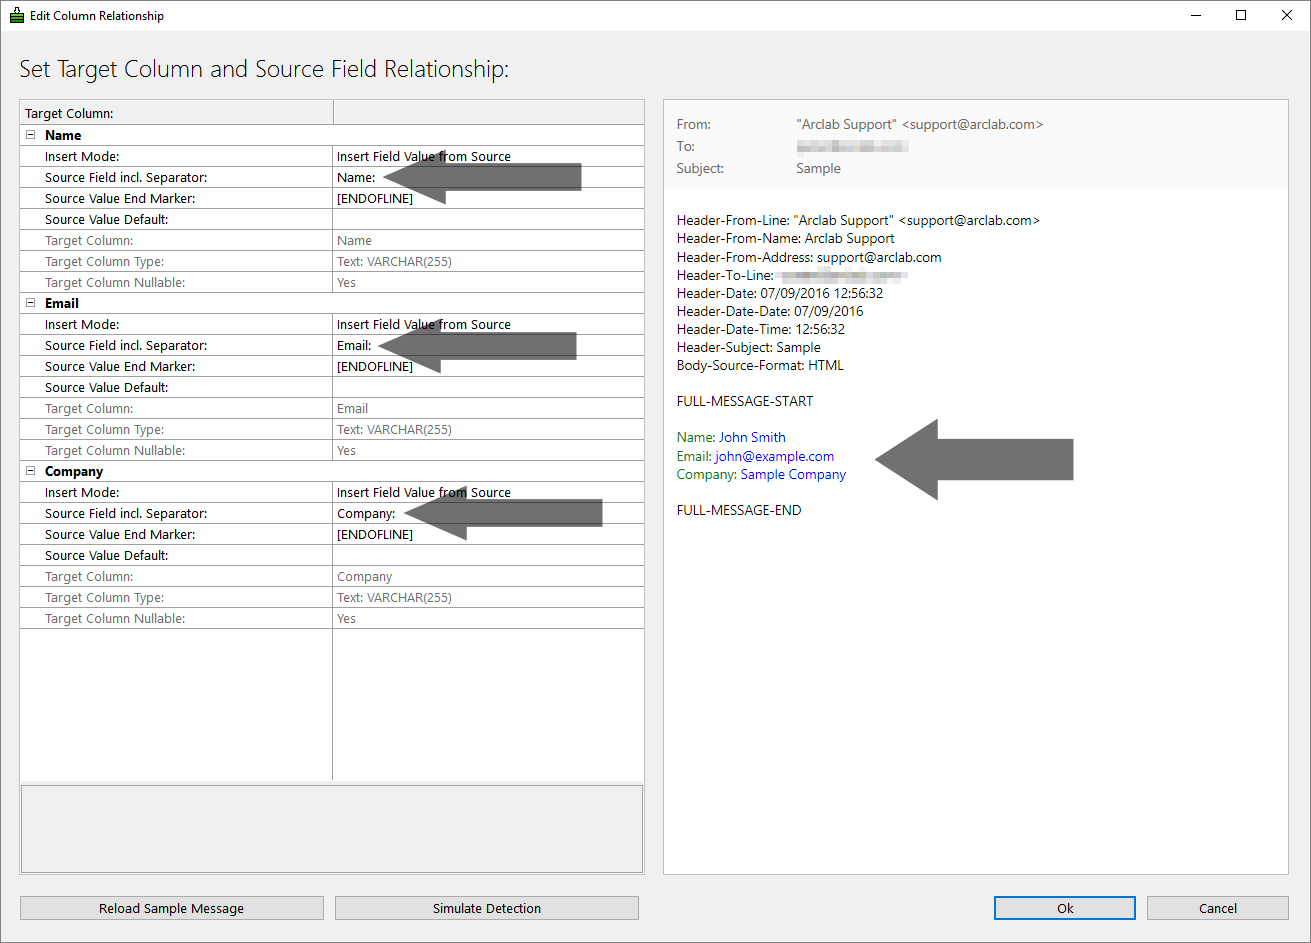
You can verify the mapping in the preview on the right. Source fields are highlighted in green and the values in blue color.
Insert Mode
Inbox2DB lists all fields (columns) from the target database. It also shows the column type (database field type).
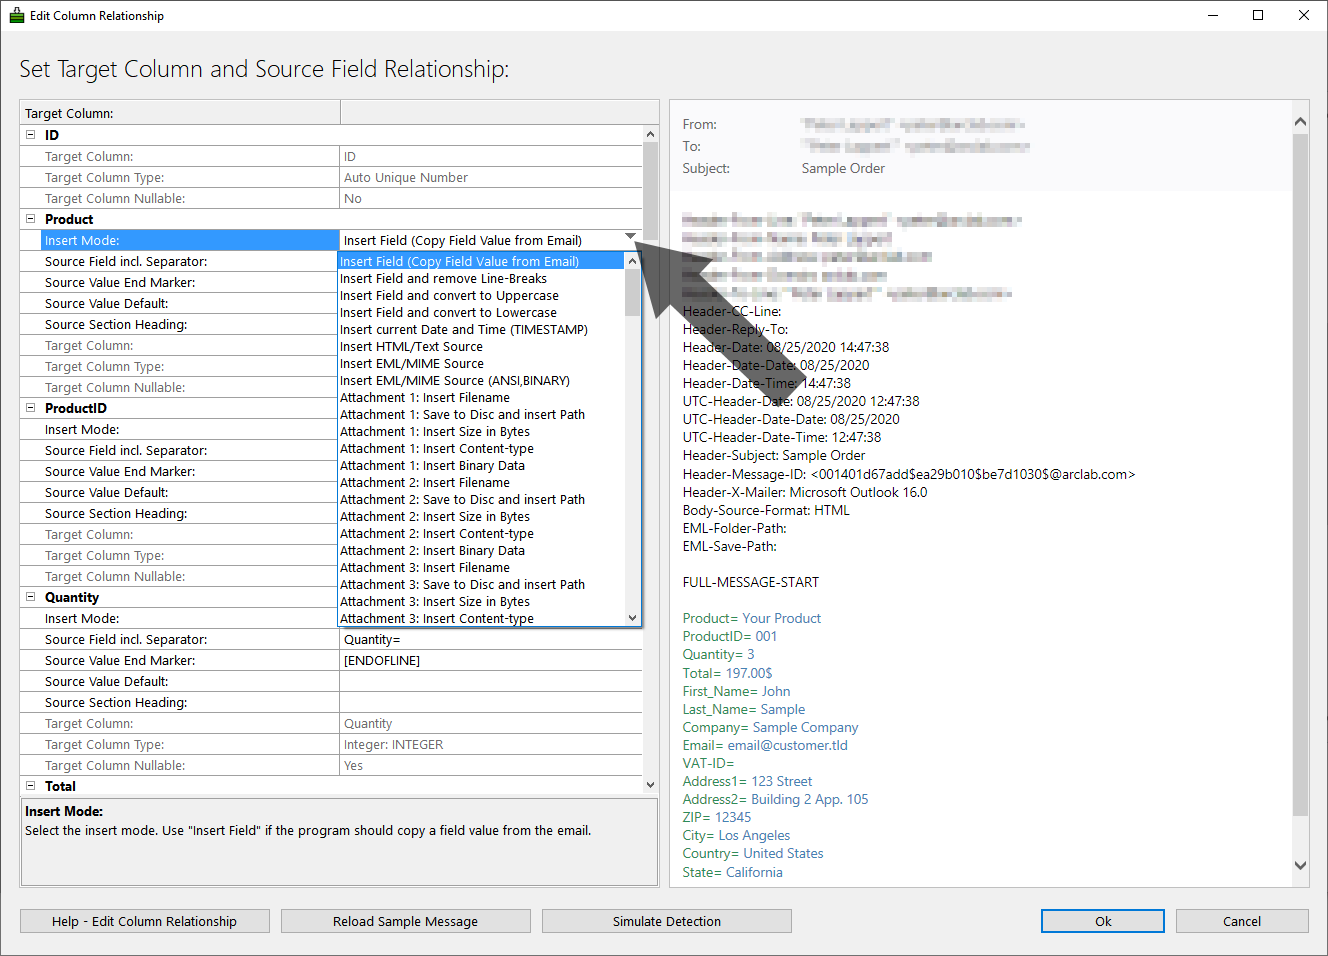
The default "Insert Mode" is "Insert Field", which means it inserts the value (unchanged*) from the email to the database.
arrow_forward Insert Field (Copy Field Value from Email):
The source value will be inserted unchanged* into the database.
*
Leading and trailing white-spaces will be removed in all modes!
The text between the "Source Field incl. Separator" and "Source Value End Marker" will be copied to the database field.
See also: Source Field incl. Separator
arrow_forward Insert current Date and Time (TIMESTAMP):
The program inserts a timestamp (current date and time) to the database
instead of copying the source value.
You don’t need to specify a "Source
Field" or "End Marker" here.
arrow_forward Insert Field and remove Line-Breaks:
Use this mode if the program should remove line-breaks from the source
value.
Sample:
Product=
Arclab
Inbox2DB
will be inserted as:
Arclab Inbox2DB
arrow_forward Insert Field and convert to Uppercase:
Converts the source value to uppercase chars.
Sample:
Product= Arclab Inbox2DB
will be inserted as:
ARCLAB INBOX2DB
arrow_forward Insert Field and convert to Lowercase:
Converts the source value to lowercase chars.
Sample:
Product= Arclab Inbox2DB
will be inserted as:
arclab inbox2db
arrow_forward Insert EML/MIME Source
Copies the full message source in EML/MIME format (unicode) into the
target field.
The message source includes the email header, all body
parts and attachments.
You don’t need to specify a "Source Field" or
"End Marker" here.
Important: The target field should be a long text field,
e.g. LONGVARCHAR or LONGTEXT.
Make sure the target field is large enough
to hold the data.
arrow_forward Insert EML/MIME Source (ANSI)
Same as "Insert EML/MIME Source", is almost the same as "Insert EML/MIME Source", but the email source code is transmitted binary in ANSI format. Use this option if you want to insert the EML source into a binary database field (as ANSI text) or if you have issues working with the unicode version.
arrow_forward Attachment No. Insert Filename
Inserts the attachment filename into a text field. The filename is extracted
from the attachment header.
You don’t need to specify a "Source Field"
or "End Marker" here.
Sample:
image.jpg
arrow_forward Attachment No. Save to Disc and insert Path
Inserts the storage path into a text field and at the same time activates
the storage of the attachment on the drive.
You don’t need to specify
a "Source Field" or "End Marker" here.
Sample:
C:\Users\Public\Documents\Arclab Inbox2DB\att\Hostname\2020-08-14\49AAAFB01D6723E\image.jpg
arrow_forward Attachment No. Insert Size in Bytes
Inserts the attachment size in bytes into an integer/long or text field.
The size is the actual size of the binary attachment in bytes.
You don’t
need to specify a "Source Field" or "End Marker" here.
Sample:
64365
arrow_forward Attachment No. Insert Content-type
Inserts the content-type of the attachment in a text field. The content-type
is extracted from the attachment header.
You don’t need to specify a
"Source Field" or "End Marker" here.
Sample:
image/jpeg
arrow_forward Attachment No. Insert Binary Data
Inserts the binary data of the attachment into a database field.
You
don’t need to specify a "Source Field" or "End Marker" here.
Important: The target field should be a binary field,
e.g. BLOB or LONGVARBINARY.
Make sure the target field is large enough
to hold the data.
arrow_forward Insert HTML/Text Source
Copies the HTML source (or text source if the email is in plain text
format) into the target field.
You don’t need to specify a "Source Field"
or "End Marker" here.
Important: The target field should be a long text field,
e.g. LONGVARCHAR or LONGTEXT.
Make sure the target field is large enough
to hold the data.
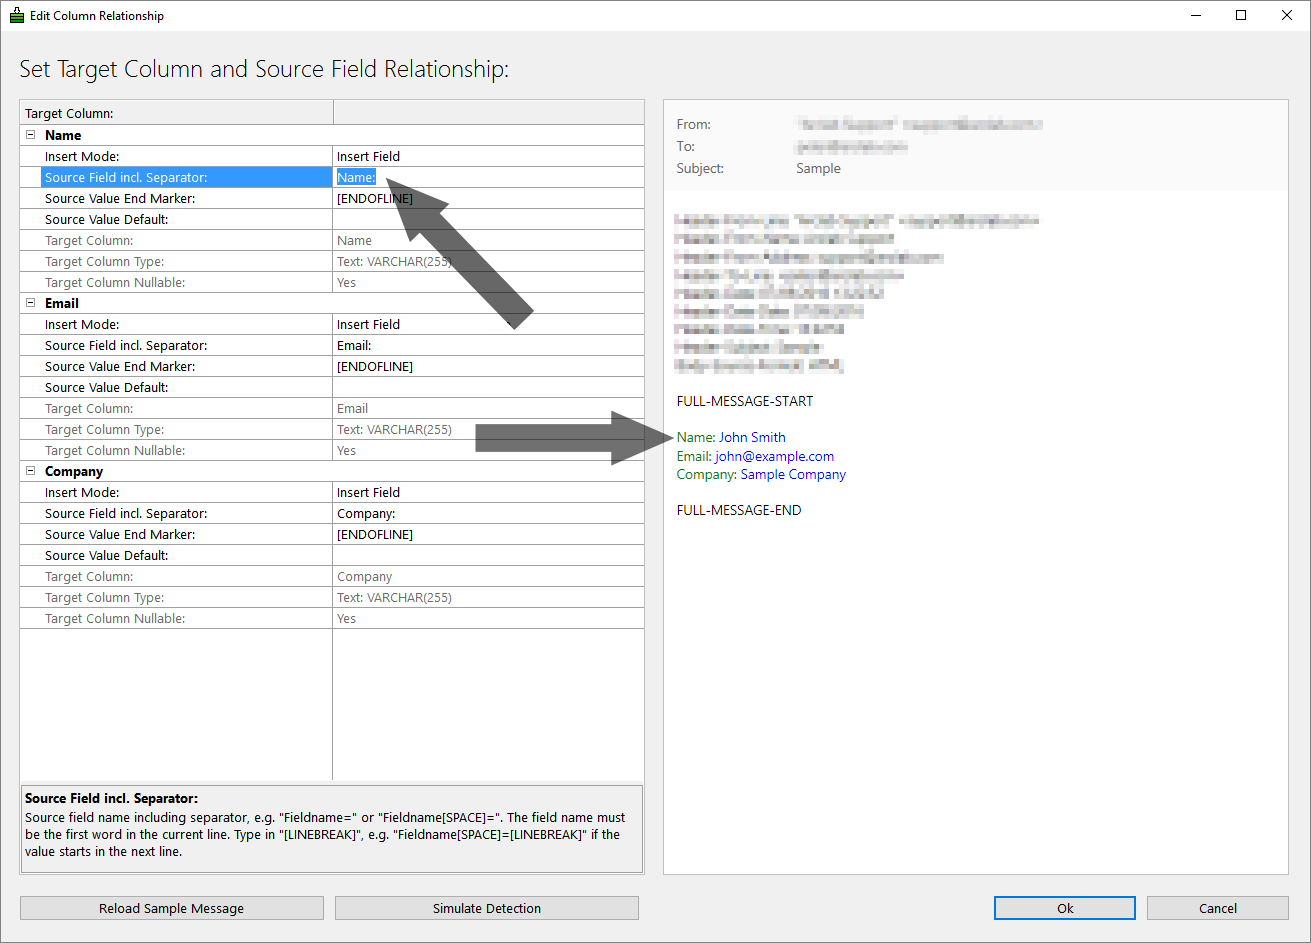
Source Field incl. Separator
Field: value
The "Source Field incl. Separator" is the field name ("Source:") including the separator and starts from the beginning of the line. It builds the connection from the source field to the output field in the database. The program auto-detects matching field names, but you can also use different field names in the source email and target database. The program converts HTML messages to text, so you don't need to care about the message format.
Samples: |
Source Field incl. Separator: |
Source Value End Marker: |
| ProductID: 001 | ProductID: | [ENDOFLINE] |
| ProductID= 001 | ProductID= | [ENDOFLINE] |
| ProductID = 001 | ProductID = | [ENDOFLINE] |
| ProductID 001 | ProductID | [ENDOFLINE] |
| ProductID >>> 001 | ProductID >>> | [ENDOFLINE] |
| Product: Your Product |
Product:[LINEBREAK] | [ENDOFLINE] |
| Total Amount of Order: 99$ | Total Amount of Order: or Total[SPACE]Amount[SPACE]of[SPACE]Order: |
[ENDOFLINE] |
| Product: Your Product |
Product:[BLANKLINE] or Product:[LINEBREAK][LINEBREAK] |
[ENDOFLINE] |
See also: Help for duplicate field names in the source email
Available Placeholders in "Source Field incl. Separator":
- [SPACE]
- [LINEBREAK]
- [BLANKLINE] (equals two line-breaks)
Click on "Simulate Detection" to verify the settings after you made any changes.
Source Value End Marker
Field:
value
... other field or text
The "Source Value End Marker" defines the end of the value. The default "Source Value End Marker" is [ENDOFLINE], which means the program extracts the data (value) from the "Source Field incl. Separator" to the end of the line.
- If you don't want to extract the value to the end of the line, define a different "Source Value End Marker".
- You can select an end marker from the drop-down or select the text in the drop-down and type in a custom end marker.
- You cannot use [ENDOFLINE] for multi-line values, because there is a line break in the source value.
- The program removes leading and trailing white-spaces from the value.
Samples: |
Source Field incl. Separator: |
Source Value End Marker: |
| ProductID: 001 | ProductID: | [ENDOFLINE] |
| ProductID: 001 |
ProductID:[LINEBREAK] | [ENDOFLINE] |
| ProductID: 001; | ProductID: | ; |
| Price: 199$ | Price: | $ |
| ProductID: "001" | ProductID: " | " |
| ProductID: 001 ABC (static text after value) | ProductID: | ABC |
| ProductID: 001 random (copy from space to space) | ProductID:[SPACE] | [SPACE] |
| <UID>123456</UID> | <UID> | </UID> |
Multi-Line Value Samples: |
Source Field incl. Separator: |
Source Value End Marker: |
| Product:
Your Product using 2 lines of text followed by a blank line ... |
Product: | [BLANKLINE] |
| Product:
Your Product using 2 lines of text followed by static text ABC |
Product: | [LINEBREAK]ABC |
| Product:
Your Product using 2 lines of text followed by another field Name: John |
Product: | [LINEBREAK]Name: |
| Product: Your Product using 2 lines of text followed by another field Name: John |
Product:[LINEBREAK] | [LINEBREAK]Name: |
See also: Help for duplicate field names in the source email
Available Placeholders in "Source Value End Marker":
- [ENDOFLINE]
- [SPACE] Important: Type in [SPACE] don't use the space key!
- [LINEBREAK]
- [BLANKLINE] (equals two line-breaks)
Click on "Simulate Detection" to verify the settings after you made any changes.
Source Section Heading
Normally, the field names in the source mail must be unique so that an assignment is possible. This issue was resolved in version 4.6 by introducing section headings. The prerequisite for this, of course, is that the source email has corresponding headings.
- Only enter a "Source Section Heading" if the source email contains duplicate field names in different sections.
- The program ignores everything above the heading when searching for the field name.
- The "Source Section Heading" applies only to the current field name and has no effect on other field names in the source email.
- If the "Source Section Heading" is not found, the field will not be processed.
- Click here for details and a sample
Header Fields: From, To, Subject, Date
Of course, you can also insert information from the message header into
the target database.
All available header fields are displayed in the
preview:
|
|
Source Field incl. Separator: |
Source Value End Marker: |
| Sender Name and Email Address (Header From) | Header-From-Line: | [ENDOFLINE] |
| Sender Name | Header-From-Name: | [ENDOFLINE] |
| Sender Email Address | Header-From-Address: | [ENDOFLINE] |
| Sender Email Domain (Organization) | Header-From-Domain: | [ENDOFLINE] |
| Header "To:" | Header-To-Line: | [ENDOFLINE] |
| Header "CC:" | Header-CC-Line: | [ENDOFLINE] |
| Header "Reply-To:" | Header-Reply-To: | [ENDOFLINE] |
| Header Date and Time | Header-Date: | [ENDOFLINE] |
| Header Date | Header-Date-Date: | [ENDOFLINE] |
| Header Time | Header-Date-Time: | [ENDOFLINE] |
| Header Date and Time (UTC) | UTC-Header-Date: | [ENDOFLINE] |
| Header Date (UTC) | UTC-Header-Date-Date: | [ENDOFLINE] |
| Header Time (UTC) | UTC-Header-Date-Time: | [ENDOFLINE] |
| Message Subject | Header-Subject: | [ENDOFLINE] |
| Message-ID | Header-Message-ID: | [ENDOFLINE] |
| In-Reply-To | Header-In-Reply-To: | [ENDOFLINE] |
| X-Mailer | Header-X-Mailer: | [ENDOFLINE] |
Click on "Simulate Detection" to verify the settings after you made any changes.